This month's Tips and Tricks webinar series focused on all of the Tips and Tricks Webinars we did this year! If you did not have a chance to join us for this session, here is a recap of what you missed!
The Form Builder
The Form Builder is a powerful tool that will allow you to build forms of all kinds to host on your website or send directly to a client using a URL. Through these forms, you can automatically create events in Details that will include the information they provided in the form through data mapping!
Custom Subdomains
Forms can, optionally, be hosted at custom subdomains of your choice. That means the link your forms are accessed at can start however you'd like, perhaps using your company name, instead of having the phrasing 'details.flowers' at the beginning. This is a great opportunity for you to continue branding your company and your growth to success.
If you want to choose a subdomain, please fill out this form, and our Support Team will contact you. There are many combinations to choose from; however, they are first come, first served, so we may not have the exact URL you request if it's been claimed by another account already.
Accessing the Form Builder
To access the form builder, follow these steps: Click the main menu in the upper left-hand corner Select 'Form List' from the available options
To learn how to build your first form in The Form Builder, check out our Support Article!
The Costs Page
Details makes creating your order sheet easy using the 'Costs' page of the event. On the costs page, in the upper right-hand corner, you see the 'Cost Info' section.
To the right of the 'Cost Info', you will see the 'Wholesale Quotes' section. We are partnered with some amazing wholesalers who can order from directly through Details! Select a wholesaler to request a quote for the items you will need. Follow these steps to build you quote:
Select a few items or select all items at once by clicking 'Check All' in the bottom right-hand corner.
Adjust the 'Ask Price/Stem' or keep the price that is pulled from the listed price of the item in your 'Item Gallery'
Adjust the 'Quantity' for the number you would like to order is different from the amount listed which is pulled from the quantity listed on the 'Worksheet'
Click 'Save & Send' to send the quote to the wholesaler
You can keep track of your sent quotes from this page as well. Chat with the wholesaler using the 'Messages' section, see information about the wholesaler using the 'Seller' section, and view information about your quote, including the asking total using the 'Quote Info' section!
If your wholesaler is not listed, you can always request a wholesaler using the 'Request A Wholesaler' form. Though we can't guarantee we will add them to our list of wholesalers, this will help us to reach out in the future!
You can also set the wholesalers you want at the top of your costs page by clicking 'Set Wholesalers' and toggling the wholesalers on or off.
As an added feature, if your event contains items from Accent Decor, you can order from them directly through Details!
You can download a CSV from this page or print it off for your records. Check out our Support Article on the costs page to see that costs page in action!
The Item Gallery
The Collections feature is a great organizational tool. You can create and completely customize your own collections for whatever suits your needs!
Adding a New Collection
To create a Collection, follow these steps:
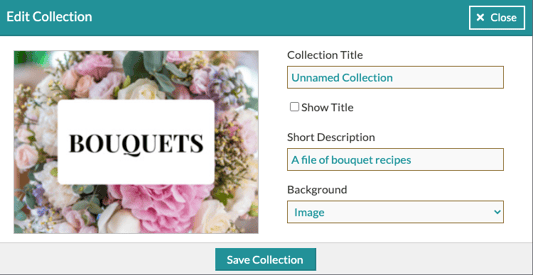
Start by clicking the 'Add New' button in the top-right corner, and select 'New Collection'
The Collection modal will pop up in the center of the screen, and you should start by filling in the Title and Description fields.
Optionally, you can set a background image or color for the new Collection. Use the Background drop-down to select an option and either select your color using the Color Palette tool or upload an image!
Optionally, you can choose to hide or display the Title.
When you're done, click 'Add Collection' to complete the setup!
Adding Items to Collections
Once you've created a Collection, it's time to add items!
This is always done by either copying or cuttingitems to a clipboard. Once you've selected the items you want, the clipboard will open, and you can then use the navigation tool (as seen above) to get to the Collection you want to paste into.
Note: You cannot 'cut' an item from the All Items or My Items Collections.
There are a couple of different ways to go about this. You can right-click on a single item and select 'Copy' to put it on the Clipboard, or you can select multiple items at once using our new Selection Mode.
The Clipboard
Once items have been copied or cut to the clipboard, you're ready to paste them into any collection you want! The Search & Filters panel on the left side will turn into the Clipboard, so you can see what you've selected, and if you want to switch back and forth between the search options and your selected items, you'll use the 'Menu' button in the top-right of that panel to navigate.
Recipe Collections
Create custom collections of your Recipes to keep everything organized! Creating custom collections in your Recipe Gallery can help you to stay organized and create a tool for your to use during consultations with a client. Each account will have an 'All Recipes' and a 'Featured Recipes' collection in their account. From there, you can also create any collections you would like to add to your gallery.
My Recipes
The 'My Recipes' collection will house any recipes you add yourself and any recipes you add from the 'Featured Recipes' collection.
Featured Recipes
The 'Featured Recipes' collection will house recipes from our partners and featured florists as well as Details preloaded recipes that you can add to your own recipe collections. To add a Featured Recipe to your 'My Recipes' collection, click the '+' symbol in the upper right-hand corner of the recipe. When the pop-up modal appears, click the 'Add To Gallery' button to add it to your 'My Recipes' collection!
You can also choose to open the recipe and view its contents before clicking the 'Add To Gallery' button from the recipe modal as shown below.
Creating A Collection
To create a collection in your Recipe Gallery, click the '+ Add New' button in the upper right-hand corner of your gallery. Select '+ New Collection' from the available options. On the resulting screen, enter your Collection Title, Description, and Background.
Moving Recipes Between Collections
To move a recipe from one collection to another, follow these steps:
Click the 'Options' menu at the bottom of the screen
Select 'Section Mode' from the available options
Click on the recipe(s) you would like to move
Click 'Copy' at the bottom of the screen
Navigate to the collection you wish to add the recipe(s) to
Click the 'Paste' button at the bottom of the screen
Company Defaults
Setting up your Event Defaults will ensure you're applying the correct fees, taxes, and starting out with your preferred line items for new clients. These settings will apply for every event - so there's not need to adjust each time!
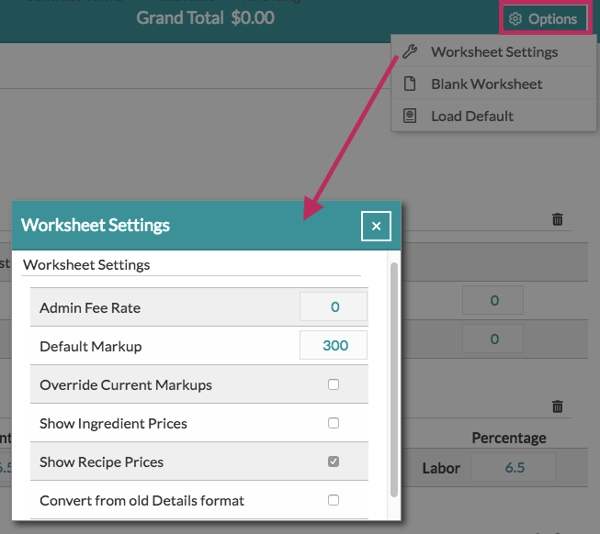
Markup:Your default markup may be adjusted by clicking the "Options" button in the screen's upper-right corner. As a reminder, prices are calculated using the cost x markup + cost. More simply put, take the markup you see and add 100% This is the total markup your recipes are using.
Admin Fee: Do you like to add a percentage to your events to pass along any credit card fees? Details make this easy! Click the 'Options' button in the upper-right corner of the screen and type in your percentage in the Admin Fee box. Please confer with your accountant before you charge any convenience fee to learn if it is legal in your state and/or how to apply it appropriately.
Tax Rates: If you're starting, you should already see a tax row on your Worksheet. Enter in the rates appropriate for your area. If you do not charge tax on Services/Labor, enter in "0". If you're adjusting your taxes and you do not see the tax row, click, hold and drag a tax section over to your Event Default Worksheet (you can even do this within a specific event!)
Categories and Line Items: One of the most important portions of updating your Event Default worksheet is setting your preferred categories and line items, so when you enter in a new client, most of the work is already done!
Hover over the category group/line item name and click to change the text.
Click, hold and drag a line item to change the order.
Click the 'X' to delete the line item or click the trash can to remove the entire section
Click inside the 'Est Price' box to update the line item with your average prices - the price will automatically "lock" in. Click the lock again to unlock it. (Locked line item prices will not adjust as you build recipes. They will stay as you set it). The Estimated Price is important when completing quick quotes - think of this as your average prices.
OPTIONAL:Click the "+" sign to add a note or description. For example, do you always offer a complimentary toss bouquet? Add in a note! This will load for every new client.
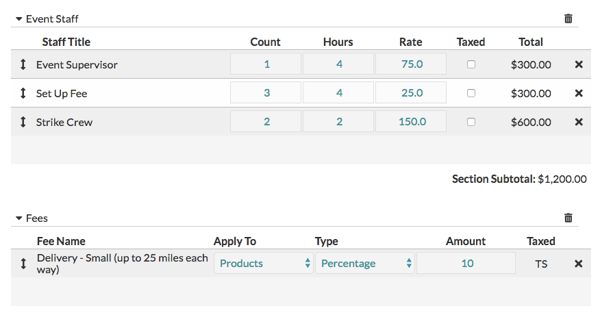
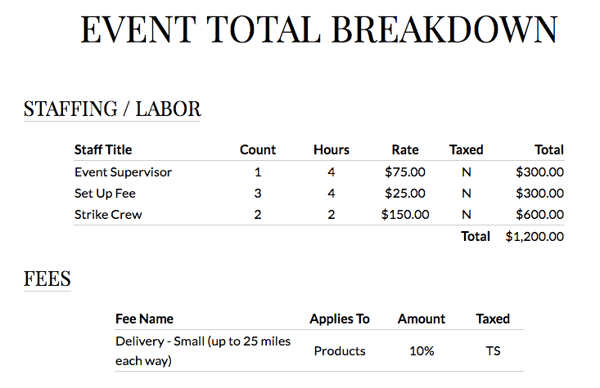
This provides you a space to list out members of your staff, the qty, hours, and rate. This area will automatically be classified as 'Labor' and can be itemized on the Breakdown page.
Here is how the 'Fees' and 'Staff and Labor' section will show on the proposal Breakdown page.
The Proposal
Without a doubt, the most fun portion of Details is customizing the proposal template for your client!
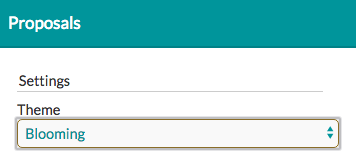
How to change the proposal theme (change the template):
Once the proposal page loads, click the drop-down menu under 'Theme' to see your list of available templates. Every account starts with Blooming, Blossom, and Vanilla. Blooming and Blossom are premium templates that you can add photos to. Vanilla is just as it sounds - a simple, timeless classic.
Special Note: You can purchase additional premium proposal templates in the Details Marketplace.
How to change the text on the template:
When it comes to editing your proposal (text and photos) the easiest way to learn what you can edit is by scrolling over the template itself. If it outlines in red, you are able to edit it.
Hover over the text you wish to edit - it will outline in red.
Click the text. This will highlight the text box on the left within the proposal editor.
Enter in your preferred text.
How to change photos on the template:
Each proposal template will always load with placeholder images. These are the images you will update before you send them to your client.
Hover over the image you wish to update - it will outline in red.
Click the image. This will pull up a photo box where you can upload a new photo, pick from your Inspiration Gallery, select from your Event Inspiration, or from the recipe and/or item images you uploaded on your Design Board (we prefer this method).
Select the image you would like and it will push to that photo box on the template.
Special Note: You might need to try a few different photos to see which one fits the best in a particular space. At this time, you are unable to move a photo/resize within a template photo space.
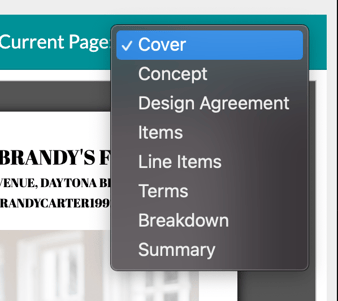
How to view different pages of the template:
On the right side of the proposal template, you will see the text 'Current Page'
Click the drop-down menu to select your desired page.
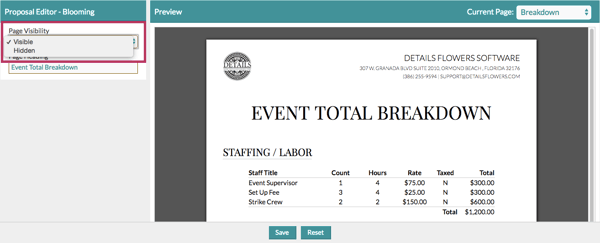
How to hide pages of your proposal:
Want to send your client the Contract Terms and Summary only? Perhaps you don't want to show the 'Breakdown' page. Hiding proposal pages allows you to customize it to fit your needs.
Go to the page you wish to hide.
On the left-hand side lives the proposal editor. Find the spot labeled 'Page Visibility'
Change it from 'Visible' to 'Hidden'
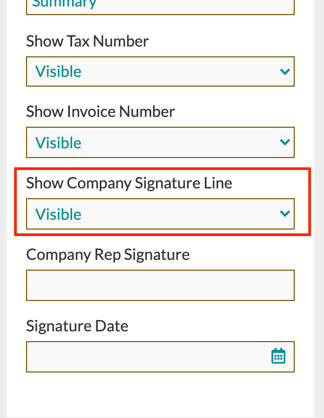
Special Note: You can also hide additional details, likeline item prices, item groups on the 'Items' page, and the company representative signature line.
How to sign your contract (Optional):
Go to the 'Summary' page of the proposal.
Click inside the 'Company Representative' box to highlight where to type in your name (in the editor to the left).
Type in your name.
Follow the same process for selecting a date.
Special Note: If you do not want to do this, you can opt to hide the signature line by changing the visibility to 'Hidden'

-1.gif?width=688&name=ezgif.com-gif-maker%20(7)-1.gif)
.gif?width=600&name=ezgif.com-gif-maker%20(9).gif)
-Jun-24-2021-06-09-28-60-PM.gif?width=600&name=ezgif.com-gif-maker%20(3)-Jun-24-2021-06-09-28-60-PM.gif)
.gif?width=600&name=ezgif.com-gif-maker%20(22).gif)

-2.gif?width=600&name=ezgif.com-gif-maker%20(24)-2.gif)
.gif?width=600&name=ezgif.com-optimize%20(2).gif)
.gif?width=600&name=ezgif.com-video-to-gif%20(23).gif)
-Aug-27-2021-03-04-49-38-PM.gif?width=600&name=ezgif.com-gif-maker%20(2)-Aug-27-2021-03-04-49-38-PM.gif)