Tips & Tricks in Review: July 2020

Every week we send out an email to existing clients with helpful tips and tricks for using Details Flowers Software. The Support Team looks at trending questions each month and works to identify ways we can help to spread knowledge to everyone using the platform. Make sure you're subscribed to the Education & Support messages from Details to get these helpful emails! 

Here's a recap of what we covered in July in the Tips & Tricks series!


The Recipe Options

Within each line item recipe is the 'Recipe Options' menu with tools to help you save and re-use your design work for each recipe. Need to save a recipe you created from scratch on the worksheet to the gallery for later use? Do it in the Recipe Options. Need to update an existing recipe with changes you made during the worksheet design process? Check out the Recipe Options!

Screen Shot 2020-06-21 at 12.59.41 PM

Check out this Support Center article for more information: Click Here


Using the Color Palette

The color palette is a quick and easy way to upgrade your proposals. Take your event designs to the next level by including a color palette - we even have tools to help you pick the colors!

There are a couple different ways to add colors, making it easy to find what you need:

  • Selecting Colors: The first and easiest way to pick a color is using a standard color picker. Drag the selector around to get the shade you need, and change the hue with the slider on the side!
  • Entering Color Codes: Need a really specific color? Enter color codes or Pantone names to find exactly the right color.
  • Select From Image: This one is really cool - you can upload a photo to the palette and select colors directly from it! Client provide you with inspiration photos? Upload them and select colors!

Pro tip: Select colors from the photo and bank them in your favorites so that you can grab all the colors you need at once without having to re-upload the image!

  • Recommendations: Use this area to find complimentary colors to fill out your palette with additional colors!

Regardless of the method, adding colors to the worksheet is done the same way; simply close the palette once you've selected the desired color and see the color on the worksheet!

Check out this Support Center article for more information: Click Here


The Delivery (& Pick-up) Checklist

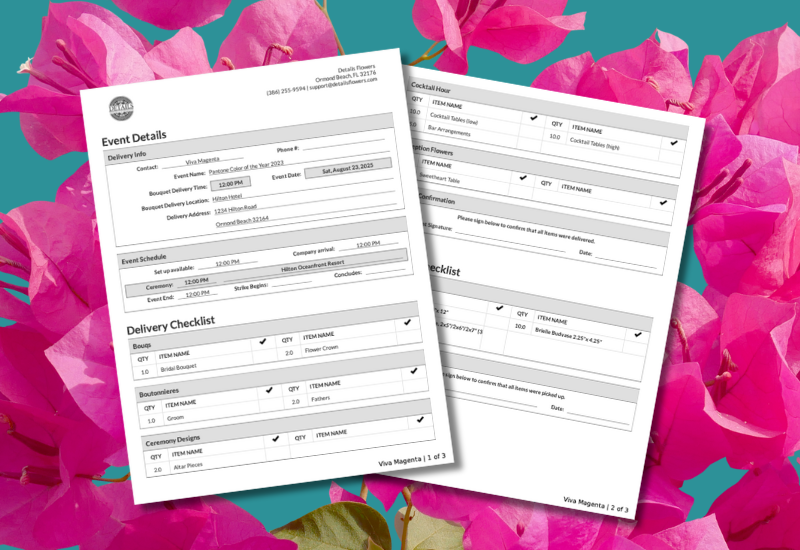
Within each of your events is a Document section where there are a few handy, printable docs meant just for you and your team. One of them is the Delivery PDF which includes contact information for your event, important times and locations, and an itemized list of all the deliverables for the event. Print or save this document to assist with your deliveries!

 
  • Delivery Checklist: Here's a list of each arrangement that needs to be delivered to this event, with a space to check off delivered items and a designated area to have your client sign off on the successful delivery!
  • The Pick-up Checklist: If your event includes rental items, a pick-up checklist itemizing each of your rental items that need to be retrieved will also be included! Also includes a designated area to have your company sign off on the successful retrieval!

Check out this Support Center article for more information: Click Here


Making the Most of Collections

You may have seen our recent webinar series about collections and how to use them effectively as tools for organization and design. In case you didn't, here are some things you may not know about collections, and some ideas for ways to use them - check out this video!

Check out this Support Center article for more information: Click Here


Navigating the Event List

Within the Event List are multiple lists to help you stay organized; the Current, Past Events, Did Not Book, and Archived lists. Knowing how to navigate these lists is essential to using the Event List!

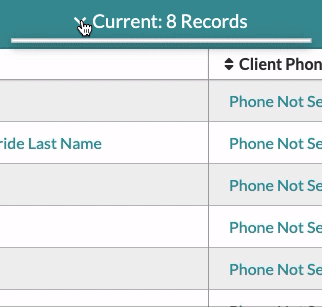
The default list, your 'Current' events, will house off of your prospective and upcoming events. If an event need to be removed for one reason or another, you have two options:

  • Locate the event on the list and check the box on the right side of it.
  • The 'Archive' and 'Mark as Did Not Book' buttons will appear at the bottom-center - select the option you want.

ArchiveEvent

If you have occasion to return an event from the 'Archived' or 'Did Not Book' lists, follow these steps:

  • Using the drop-down menu at the top of the list, select the list the desired event is contained in. For example, if you archived an event, go to the 'Archived' list - you won't be able to return an event from the 'All' list, so make sure you go to the right list!
  • Once you're on the right list, locate the event and check the box on the right side of it.
  • The resulting buttons at the bottom-center will differ depending on which list you're returning the event from, so select the appropriate (i.e. 'Mark as Active' or 'Restore') button to return the event to 'Current' events.

Check out this Support Center article for more information: Click Here

Keep an eye on your inbox each week to get in-depth educational content for all things Details and, as always, reach out to our Support Team if you need anything! You can reach us by emailing support@detailsflowers.com, from the chat option within your account, or by using the 'Contact Us' form also found within your account under the 'Support' menu!

Follow Details on Instagram!