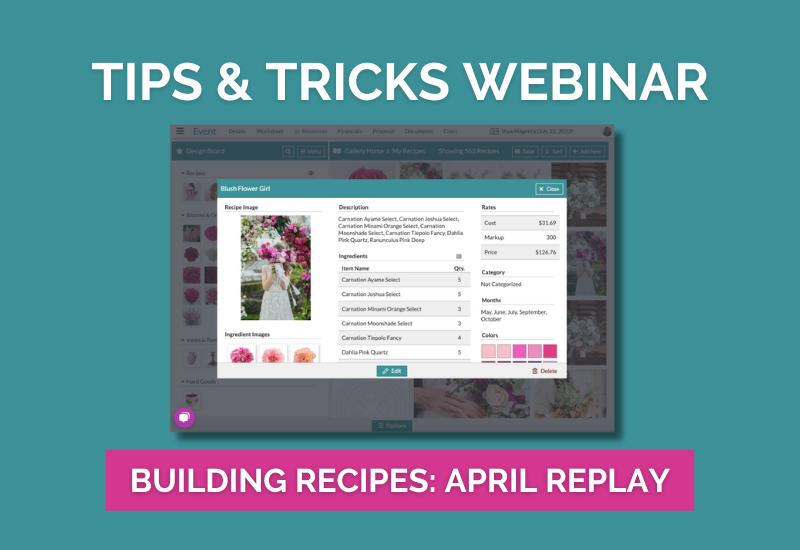
In this month's edition of our Tips and Tricks series, our Support Team Director, Brandy, discusses building Recipes in Details. If you missed our live webinar, here is a complete session recap.
The Worksheet: Building Recipes
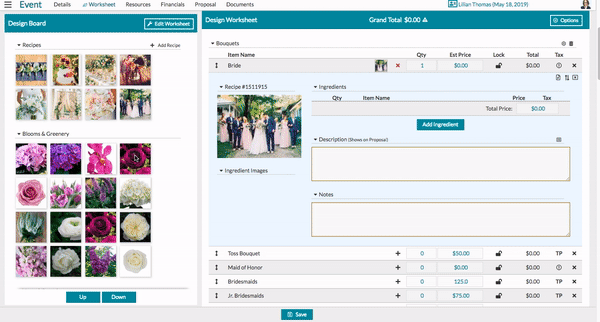
Building a recipe on the worksheet will help you accurately price your design and create additional supporting documents.
The Design Worksheet is an Event Floral Design playground! As a best practice, we recommend filling up your Design Board with anything you might use for your recipes. If you're not sure how to do that, check out the article How do I add/remove photos & ingredients on my Design Board?
Before we get started, we want to share that you are not required to build a recipe for every line item, however, this will give you accurate information like your stem counts. If you're sending off a quick quote, you can fill in the qty and price, add a photo and a description, or build the recipe. What you do may differ depending on the stage of the planning process.
Starting your recipe with a recipe (inspiration) photo or ingredient:
Make sure you have your images uploaded to your Design Board and ingredients added - this will make it much easier! If you're unsure how to do this, check out How do I add/remove photos & ingredients on my Design Board? Click, hold, and drag your image to the '+' sign of the line item. Alternatively, you can click the '+' sign and select your image. Once you do either of the above, a recipe template will open.
.gif?width=600&name=ezgif.com-video-to-gif%20(35).gif)
Adding ingredients to your recipe:
- Once the template has opened, you can add ingredients.
- To add one at a time, click, hold, and drag your ingredient into the recipe. You can add anything that is available in your items gallery.
- To add bulk, click the 'Add Ingredient' button in the recipe template. A box will pop up with all the items you starred on your Design Board. Simply click each ingredient and then click off the box. All the items will add to your recipe (this is the most efficient method!)
- Special Note: Do not click '+Add New item' as this is how you would add a brand new item to your resources and the recipe at the same time!
Changing recipe components (name, stem cost, price, and tax):
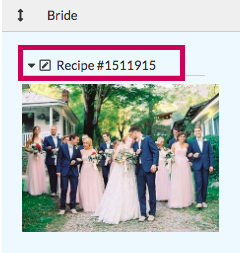
- To change the name of the recipe, hover your cursor over the recipe name (above the photo or placeholder) and click. Type in your name. If you plan on saving the recipe, we recommend placing what it is in the name. For example, 'Blush Bridal Bouquet'
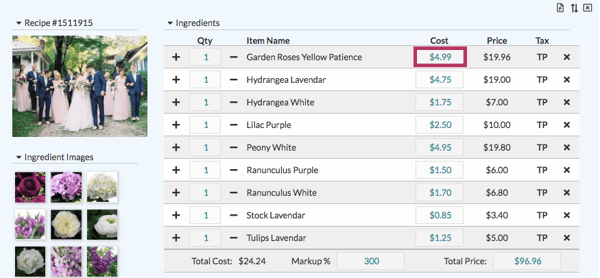
Changing the ingredient cost within the recipe:
- This allows you to adjust the cost of an item for one event. This is helpful if you're anticipating higher stem costs during a Holiday or if your client is purchasing a rental. To do this, click inside the cost box and change it to your new cost. It will update and use that cost within all recipes for that singular event. It will not update it for others.
- Special Notes: If you update markup/cost information, ensure your recipe is unlocked (without a red lock). This will allow the software to recalculate the price.
- Your privacy mode is on if you do not see the 'Cost' column. Click your user icon in the upper-right corner to turn this off.
To update the price (what your client will see on the proposal):
Click inside the 'Estimated Price' box and type in your custom price. It will automatically lock once you hit enter, but you can always unlock it if needed.
-1.gif?width=600&name=ezgif.com-video-to-gif%20(1)-1.gif)
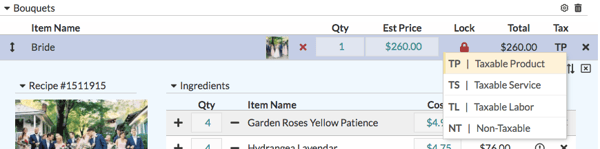
Changing how your line item (or individual ingredient) is taxed:
- To change how Details categorizes the total (price) of your recipe, click the 'TP' once your price is locked in and select one of the other options. TS is Taxable Service, TL is Taxable Labor, and NT is Non-Taxable Product. If you do not charge tax on either of the above, don't worry! If you've adjusted this in your settings, it will apply a 0% tax. If you're unsure if you've done this, check out How do I build my Event Default Worksheet? (admin fee, taxes, line items, and fees)
To change the tax for an individual ingredient:
- First, make sure your recipe price is unlocked.
- Find the specific ingredient, right-click the TP to open the menu, and select your preferred option.
- Special Note: This is a great option if you do not charge tax on your rentals!
The difference between recipe Description and Notes:
- The 'Description' section is a place for you to write in a beautiful description of your recipe. If you choose to save your recipe, this will save with it. The description shows on the proposal, but not the Recipe PDF.
- The 'Notes' section is a place for you to type in any design notes, such as 'photo for inspiration only' or 'Sarah would like the bouquet a bit larger than what's shown in the photo'.
- Notes do not save with the recipe. Notes will show on the Recipe PDF and the Proposal.
Adding the ingredient list:
- Want to share the specific blooms you will be using with your client? Add the ingredient list into your Description!
- Click the notepad icon to copy the list to your clipboard.
- Paste into your Description or Notes (both are shown on the proposal, but remember the Description saves with the recipe).
.gif?width=600&name=ezgif.com-video-to-gif%20(2).gif)
Changing the recipe photo:
- Found another image that suits the recipe better? You can update it directly within the recipe. If you already saved the recipe - make sure you update it!
- Click the recipe image and a box will pop up that will allow you to upload a new image, or choose from your inspiration, Design Board recipe photos, and/or Design Board ingredients.
.gif?width=600&name=ezgif.com-video-to-gif%20(3).gif)
Adding and Editing Recipes in The Recipe Gallery
Adding Recipes:
Click 'Add New' from the Recipe Gallery in the top-right corner.
The resulting window will include a blank slate to create a recipe, and fill in the applicable fields to build out the arrangement. It is often easiest to start by uploading a recipe image and then using it to inform what is entered in the rest of the fields!
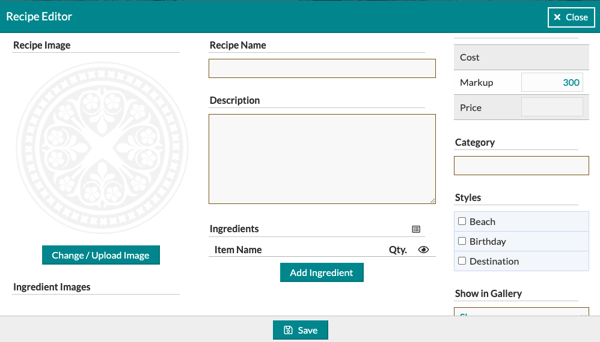
Recipe Image: Click the 'Change/Upload Image' to select a photo from your computer to upload as the Recipe image.
Recipe Name: Enter a descriptive title; or whatever is going to be easiest to search for later when you need to locate and access the Recipe.
Description: Optionally, include a description of the arrangement, but keep in mind that it is meant for clients to view the proposal. So make it flowery!
Ingredients: Enter ingredients one at a time by clicking 'Add Ingredient', entering a search term, selecting the desired item from the resulting list, and then entering a quantity to finish adding that ingredient. Repeat these steps for each additional ingredient.
Copy Ingredient List: You will see a list symbol in the upper right-hand corner of the 'Ingredients' area. Clicking on this field will copy the list of ingredients to your computer 'Clipboard'.
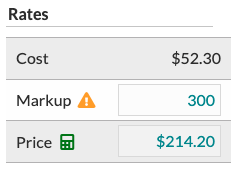
Rates
- Cost: This field will automatically populate with the cost of the recipe ingredients after it has been saved
- Markup: Optionally, a markup percentage can be entered into this field for this particular recipe. If you change the recipe markup at any point after the first save, you will see an orange triangle pop up, notifying you that your markup differs from the same markup. If you want to revert to the original saved mark, click on the orange triangle to do so.
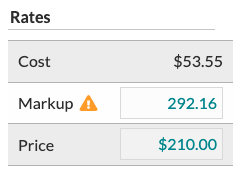
- Price: The price is determined by the markup of the cost. Optionally, a flat price may be entered into this field to override the automatically calculated price. If you make changes to the ingredient prices or quantities within the recipe, you will see an alert letting you know that the cost has changed. If you want to update the Price based on your updated Cost, click on the calculator to do so before saving.
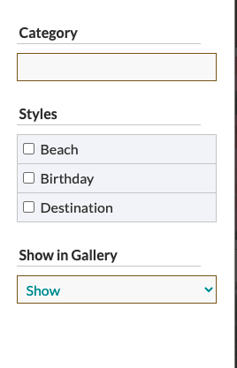
- Category: For organizational purposes, recipes can be categorized. This is particularly useful if you use the Search & Filters to narrow your gallery to specific categories. You can create your own 'Categories' or choose from the auto-complete options that appear.
- Styles: Optionally, recipes can also be assigned different styles. Again, This is particularly useful if you're using the Search & Filters to narrow your gallery down to specific styles.
- Show in Gallery: Set this recipe to hidden or displayed in your gallery. It will default to being displayed.
Editing Recipes
Open a recipe and click the 'Edit' button at the bottom of the recipe modal to initiate, then refer to the steps above and save to complete!
Watch the full Webinar replay below!